Everyone has probably heard of the Blackmar-Diemer Gambit (BDG) and locally, Alan Dommett has even written an informative, entertaining book on it as a tribute to Emile Joseph Diemer, which was published in 2003 and dedicated to Alan’s wife, Marion, (which you can see here on Amazon).
As some of you may know, Alan has been a devoted supporter of the BDG and has secured many exciting victories with it over the years. He even persuaded me to play it with some success at the British Championships. Some critics may argue that it is simply too risky and that against today’s top chess engines it is fatally flawed. However, one cannot deny its adventurous, swashbuckling, not for the faint-hearted style, and as we all know, we do not play against chess engines but against other flawed humans when their ticking clock is not on their side!
What some people may not know is that the BDG is not just for d-pawn players, it can also be played in many other settings as a surprise weapon, particularly against those stodgy e-pawn defences when Black plays an early d5.
In this article, to keep it at a manageable size, Alan and I will show many of these transposition possibilities but mainly focus on how to use the BDG (but not as we know it!) against two of Black’s mainstream defences to e4, namely the French and Caro Kann, whilst also providing ideas against less played defences, specifically the Nimzowitsch and Alekhine. We finish with the Scandinavian Defence but this needs no introduction for BDG players. The lines we suggest have not been extensively analysed but are designed to whet the reader’s appetite to explore further. We also accept the unusual line versus the Caro Kann Defence is not a true BDG but as White is sacrificing a pawn in the main line we have incorporated it. Most importantly, we think it is sound!
To cater for different viewing styles, at the start of each major variation there is a choice between reading down the page or jumping to an interactive board – take your pick!
Martin Simons
22nd May 2021
1. BDG versus the French Defence – The Alapin-Diemer Gambit
The Alapin-Diemer Gambit is an exciting way to play against the French as it steers the game away from blocked positions which many French players love. It is probably not fully sound but some may say the same can be said for many other BDG lines too.
However, this is not the point as one weak move by Black and White can enjoy a dashing game full of sacrificial possibilities, ideal for the fearless Gambiteer!
1.e4 e6 2.d4 d5 3.Be3
This is the first part of the Alapin-Diemer Gambit plan. White is encouraging Black to capture the e-pawn and then play a delayed f3. It is surprising how many French players seem to struggle against it as the gambit lines look nothing like a French.
3…dxe4
If Black does not wish to play ball, as sometimes happens, and tries to stick with the French by playing 3…Nf6 then 4.e5 Nfd7 5.f4 with an improved French (for White) as White’s queen’s knight hasn’t been committed to c3 meaning that when Black plays c5, White can simply defend with c3. However, this is outside the scope of this article.
4.Nd2
This is the second part of the Alapin-Diemer Gambit plan, the knight is often much better placed on d2 than in other BDG lines, where it can swing to the kingside via c4 and e5 or e4 and g5 adding another piece into any attack.
4…Nf6 5.f3
And we all know this move which forms the third part of the plan!
Variation A – Black plays passively
5…exf3 6.Ngxf3 c6 7.Nc4 Nbd7 8. Bd3 Be7 9.O-O O-O 10.Nce5
White has a significant lead in development. If Black continues to play quiet moves with 10…Qc7 11.Qe1
b6 12.Qh4 White is completely winning!
There are so many thematic sacs in the position. e.g. 12…c5 13.Bg5 h6 14.Bxh6! White needs no invite!
14…gxh6 15.Qg3+ Kh8 16.Nxf7+ Rxf7 17.Qxc7 winning.
Variation B – Black plays sensibly
5…exf3 6.Ngxf3 b6
Another natural reaction of a French player when faced with the Alapin Diemer, giving his light squared bishop some air. The problem with this development is that it doesn’t interfere with White’s plans at all.
7.Bd3
7.Ne5 Nbd7? 8.Nc6 could be embarrassing.
7…Bb7 8.O-O Nbd7 9.Qe1 Be7
It looks as if Black has no qualms about castling short.
10.c3 O-O 11.Qh4
Up to this point both sides have played sensible moves.
11…Ne4
The fianchetto bishop makes this move possible but the attack on the queen has no real effect in this line as the h3 square serves the same purpose as h4 and is arguably safer.
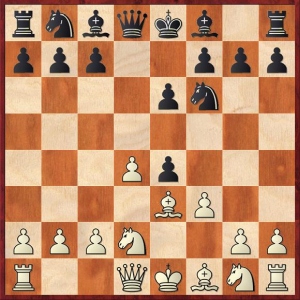
12.Qh3 Ndf6 13.Bg5!?
13.Rae1 bringing the final piece into the game is also possible and maybe even stronger e.g. 13…c5 14.Bh6!? and in this wild position White has excellent practical chances!
13…Nxg5 14.Nxg5 h6
15.Rae1!
Although chess engines suggest Black is doing fine, there are plenty of opportunities to go wrong, an ideal battleground for the Gambiteer!
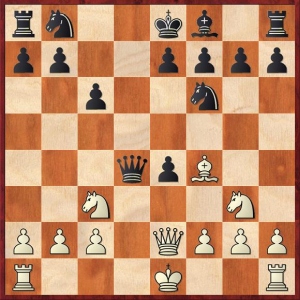
15…c5?
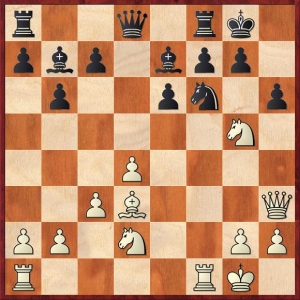
15…hxg5? fairs no better after 16.Rxf6! g6 17.Bxg6! fxg6 18.Rxg6+ Kf7 19.Qxe6+ Ke8 20.Rg7 Qd6 21.Rxe7+ Kd8 22.Re8+ Rxe8 23.Qxe8 is mate.
16.Nxe6 fxe6 17.Qxe6+ Kh8
If 17…Rf7 18.Bg6 Bd5 19.Bxf7+ Kf8 20.Qxd5! Nxd5 21.Bxd5+ Bf6 22.Bxa8 Qxa8 23.dxc5 and White is winning.
18.Qxe7 White is now better but Black’s next move is a decisive error.
18…Qd5?
A very natural move but it overlooks a nice tactic.
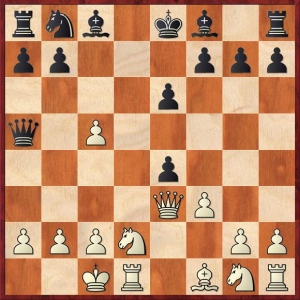
19.Be4! Nxe4 20.Rxf8+ Rxf8 21.Qxf8+ Kh7 22.Nxe4 and Black resigns in Dommett (2271) v camaroa (2140) 2018.
Variation C – Black plays more actively
5…Nd5
This is a logical idea to exchange White’s dangerous bishop on e3. However, White does not move the bishop, besides it cannot move to f2 due to 6…e3, but it can be defended by the queen.
6.Qe2
Variation C1 – Black exchanges straight away
6…Nxe3 7.Qxe3 exf3 8.Ngxf3 Be7 9.Bd3 O-O 10.O-O Nd7
This is a standard Alapin-Diemer position and we feel White has good practical chances in over the board play. Here are a couple of ways the game might continue.
Variation C1A
11.Rae1 c5
This is the standard response but White often gives up the d-pawn.
12.Ne5 cxd4?
This obvious and natural move is simply bad and plays into the Gambiteer’s hands.
13.Qh3! g6
If 13… h6 then 14. Nxf7! Rxf7 15. Rxf7 Kxf7 16. Qxe6+ Kf8 17. Bc4 and it is mate in one.
14.Rxf7!
A great thematic sacrifice to remember!
14…Rxf7 15.Nxf7 Kxf7 16.Qxh7+ and it is mate in 2.
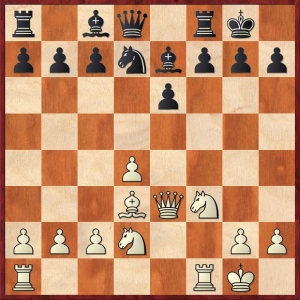
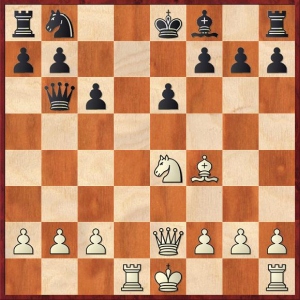
Variation C1B
Simons v Brusey (2000) took a different course with …
11.Ne4 c5 12.Neg5 h6 13.Nxe6 fxe6 14. Qxe6+ Kh8 15.Qg6 Nf6
16.Ne5!
This looks like it loses a piece but after 16…Qxd4+ 17.Kh1 Be6 Black realises White’s plan but it is too late.
If 17…Qxe5 18.Rxf6! as in the game.
White now has 18.Rxf6! Bg8 19.Nf7+ Rxf7 20.Rxf7 Bd6 21.Re1 Bxh2 22.c3 and Black resigned.
Variation C2 – Black delays the exchange
6…c5!? This maybe an improvement as Black gets on with the plan to attack White’s centre rather than allow easy development but White still has good chances.
7.dxc5 Nxe3 8.Qxe3 Qa5 9.O-O-O
9…Qxc5
9…Bxc5? looks tempting to develop a piece and attack the queen but after 10.Qg5! White is substantially better. Nb3 and Nc4 are threatened to start with.
9…Qxa2? looks dangerous but after 10.Nb3 the hunter may soon become the hunted! e.g. 10…Be7 11.Bb5+
(11.Ne2 Bf6 12.Nc3 Bxc3 13.Qxc3 is an alternative way of playing when White is better).
11…Bd7 (11…Nc6? 12.Ne2 Bf6 13.Nc3 Bxc3 14.Qxc3 O-O 15.Kd2! winning) 12.Rxd7 Nxd7 13.Ne2 Bf6 14.Nc3 Bxc3 15.Qxc3 O-O-O 16.c6 and White is having plenty of fun!
10.Qxc5 Bxc5 11.Nxe4 Be3+ 12.Kb1 Ke7 with about equal chances as in Simons v Furjel 2014.
2. BDG versus the Caro-Kann Defence
Interactive board (Caro-Kann Introduction)
1.e4 c6 2.d4 d5 3.Nc3 dxe4
If White wants to play a completely clean BDG then s/he must choose between either facing the O’Kelly or Ziegler defence. The latter defence is regarded by many as the perfect BDG antidote, with IM Jovanka Houska stating as much in her book ‘Play the Caro-Kann’. However, steering the game into an O’Kelly Defence fairs no better.
4.Nge2!? is our recommended BDG (and most importantly not as we know it!) move to avoid all these technicalities.
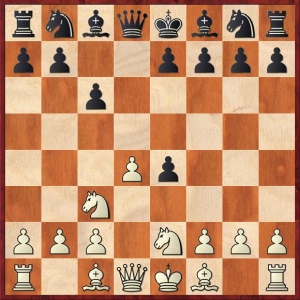
It looks a bit odd but White is seeking to maintain a knight on e4 once the Black e-pawn is captured. In our main variation, instead of giving up the f-pawn, the d-pawn is offered and it is this line we will focus on. We will also briefly cover two other lines where Black sticks with the true Caro-Kann with 4…Bf5 and the greedy 4…f5.
We should add that many BDG players would probably like to play 4.f3 to avoid placing the bishop on the weaker c4 square but after 4…Nf6 (O’Kelly Defence) if now 5.fxe4 Black can strike with 5…e5! with a comfortable/better game.
And if we venture into a pure Ziegler by playing 4.Bc4 first then after 4…Nf6 5.f3 exf3 6.Nxf3 Bf5 7.O-O e6 8.Ne5 Bg6! Black sits comfortably although both Alan and Martin have tried 9.g4?! with mixed results. However, if Black knows what to do then s/he should stand a lot better.
4…Nf6
Black can try 4…f5 to hold on to the e-pawn which seems logical if a bit risky. After 5.Nf4 Nf6 6.Bc4 White has a nice harmonious set up. One possible line 6…Qd6 to stop Ne6 and threaten g5 7.O-O g5 8.Nh5 h6 9.Nxf6+ Qxf6 10.Qh5+ Kd8 11.d5! when White has excellent compensation for the pawn deficit.
4…Bf5 is perhaps the true Caro Kann ‘at all costs’ move but is seems a bit odd to place the bishop here when the white knight is moving to g3 with a gain of tempo. In any case, White can use the move order to their advantage with 5.Ng3 Bg6 6.h4 h6 7.Ncxe4 e6 8.c3 Nd7 9.Bd3 Ngf6 10.Nxf6+ Qxf6 11.Nh5 when Black needs to exchange his bishop for the knight rather than the bishop on d3 as in most ‘standard’ Caro Kann lines. 11…Bxh5 (11…Qe7 12.Bxg6 fxg6 13.Nf4 just looks ugly for Black.) 12.Qxh5
White stands better with the two bishops on an open board.
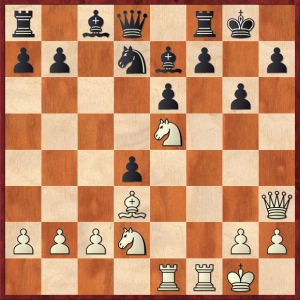
5.Ng3 Bg4 6.Be2!?
6.Qd2 was tried in Simons v Forster in Oct 2017 as an alternative safer way of playing but it is less exciting and a draw was soon agreed.
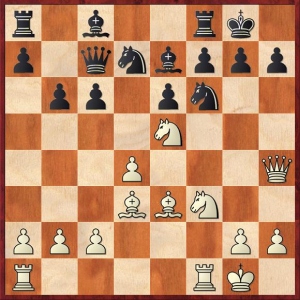
6…Bxe2 7.Qxe2 Qxd4 8.Bf4!?
White’s play is all about fast development and this is the current optimal square for the bishop. It also sets a cunning trap. Black now has 3 main choices but all look promising for White.
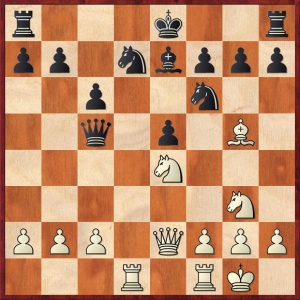
Variation A
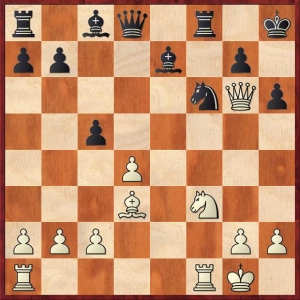
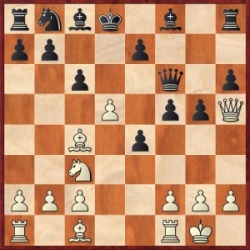
8…e6 9.Rd1 Qb6 10.Ncxe4 Nxe4 11.Nxe4
White is a pawn down but chess engines like White’s position so there is lots of opportunity to explore further! We have been following Simons v Littleton in Nov 2017 which was agreed a draw around here but after 11…Nd7 12.O-O White is already better and after 12…O-O-O? 13.Ng5 the f-pawn is impossible to defend. If Black took the bait with 11…Qxb2 then 12.0-0. White is fully developed whereas only Black’s queen is active and even that is exposed. There are host of interesting lines here but after 12…Qb6 13.Qd3 Be7 14.Qg3 g6 15.Bd6 White is completely winning as there are simply too many threats.
Variation B
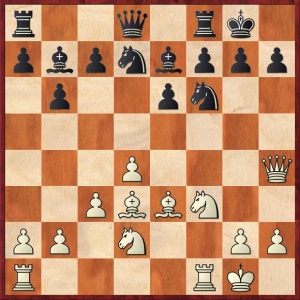
8…e5? This might seem a more natural /aggressive move but it can land Black in trouble.
9.Rd1 Qc5 10.Bg5! Nbd7 11.O-O Be7? This is natural but losing 12.Ncxe4 and amazingly White is winning!
e.g. 12…Nxe4 13.Nxe4 Qa5 14.Qg4 Nf6 15.Nxf6+ Bxf6 (15…gxf6 16.Qd7+ Kf8 17.Bh6+ Kg8 18.Qg4#)
16.Qd7+ Kf8 17.Qxb7 Rd8 18.Bxf6 gxf6 19.b4 and the queen can no longer defend the rook on d8.
Variation C
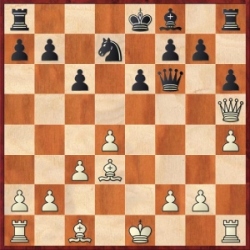
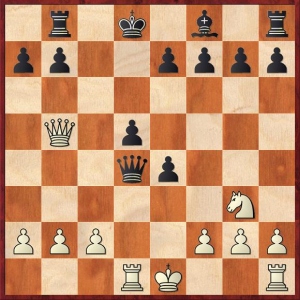
8…Nd5 This seems natural but is Black falling for White’s trap? 9.Nxd5 cxd5
9…Qxd5 10.Nxe4 threatening 11.Nd6+ 10…e6 11.O-O Nd7 12.Rad1 Qf5 13.Qd3 O-O-O 14.Be3 Kb8 15.Ng5! Whenever Black castles queenside, the f7 square becomes tender and this move simply wins!
10.Bxb8 Rxb8?
10…Qxb2 had to be tried but after 11.O-O Rxb8 12.Rab1 White has excellent compensation in a position where Black can easily go wrong e.g. 12…Qxa2? 13.Qb5+ Kd8 14.Rfd1 e6 15.c4 winning!)
11.Qb5+ Kd8 12.Rd1 winning!
In summary, there are a host of interesting lines here (with 4.Nge2) and, of course, its main advantages are that it bypasses the mass of theory surrounding a pure Ziegler and it is relatively unknown!
3. BDG versus the Nimzowitsch Defence
We can transpose into a BDG after 1.e4 Nc6 2.d4 d5 3.Nc3 dxe4 4.d5 Ne5 5.f3 exf3 6.Nxf3

6…Nxf3
6…Bg4? would be a disaster as White can play 7.Nxe5! Bxd1 8.Bb5+ c6 9.dxc6 a6 10.c7+ axb5 11.cxd8=Q+ Rxd8 12.Nxd1 and White has won a piece.
7.Qxf3 Nf6 8.Bf4 and White has more than enough compensation. The pawn on d5 is like a thorn in Black’s position.
One sample line may go 8…a6 to avoid any Nb5 or Bb5 tricks.
If 8…g6 9.Nb5 is strong.
If 8…Bd7 to try and play c6 then 9.O-O-O c6 (9… Bg4 10.Bb5+ Bd7 11.Rhe1 and White’s development lead is overwhelming. It is difficult to find a defence for Black) 10.dxc6 bxc6 11.Ba6 Qb6 12.Nb5! is pure chess engine great analysis!
9.h3 to prevent Bg4 and enable queen side castling. 9…g6 What else? 10.O-O-O Bg7 11.g4 O-O 12.Qe3 b5 13.Bg2 Bb7 14.d6 Bxg2 15.dxe7 Qe8 16.exf8=Q+ Qxf8 17.Rh2 and White is much better.
Maybe in the Nimzowitsch Defence, accepting the BDG pawn on f3 is simply bad but how many players of the Black pieces would know that?
4. BDG versus the Alekhine Defence
We can transpose into a BDG after 1.e4 Nf6 2.Nc3 d5 3.e4 and in about two thirds of the games Black plays 3…dxe4. However, White also needs to know the Hubsch Gambit as Black can also play 3…Nxe4 4.Nxe4 dxe4 but this only represents approximately a fifth of games. In the remaining games (about 10%), Black declines the gambit by playing the French Defence with 3…e6. At least here the White player will avoid the Winawer variation.
Which side benefits from the exchange of knights in the Hubsch has been open to a lot of debate! In the normal BDG the black knight on f6 is often a good defensive piece and the white knight on c3 is an innocent bystander but as more pieces come off the board the easier it is for the defender. One thing for certain is that by offering the BDG the game should look nothing like an Alekhine Defence.
We do not have space to include a full review of the Hubsch but here are a couple of sample games which show White’s potential attacking chances if Black plays the opening incorrectly. We start with a fine win by Diemer himself!
Diemer v Durao 1956
1.e4 Nf6 2.Nc3 d5 3.d4 Nxe4 4.Nxe4 dxe4 5.Bf4 Nd7 6.f3 exf3 7.Nxf3 Nf6 8.Bc4 e6 9.O-O Be7 10.Qe1
O-O 11.Bd3 Nd5 12.Be5 Bf6 13.c4 Bxe5 14.dxe5 Nf4 15.Bc2 Qe7 16.Qe3 Ng6 17.Ng5 h6?
18.Nxf7! Rxf7 19.Bxg6 Rxf1+ 20.Rxf1 Bd7 21.Rf7 Qd8 22.Qf3 Black resigns as there is no safe defence to 23.Rxg7+, 24.Qf7+ and 25.Qh7 mate as 22…Be8 allows 23.Rf8 mate!
In the following game, Black falls for a common trap!
Stader-Suhrmann 1977
1.e4 Nf6 2.Nc3 d5 3. d4 Nxe4 4.Nxe4 dxe4 5.Bc4 g6 6.c3 Nd7 7.f3 exf3 8.Nxf3 Bg7?

9.Bxf7+! Black resigned in view of 9…Kxf7 10.Ng5+ and if 10…Kg8 then 11.Qb3+ or 10…Ke8 11.Ne6 trapping the queen.
5. BDG versus the Scandinavian Defence
This needs no introduction and represents the easiest and quickest transposition as after 1.e4 d5 2.d4! it is a true BDG! We need go no further as White can simply play his or her favourite lines!
Closing Remarks
We hope this has opened up more adventurous attacking possibilities for the e-pawn Gambiteer whereupon even if you don’t always succeed, your games may become more exciting and enjoyable. Good luck!