Introduction
I thought a few times about writing an Endgame Corner on rook endings and decided against it, partly because I am not a GM standard expert on them and partly because it seemed like a large and daunting task. However, having decided that I wouldn’t do it, a couple of people suggested it would make for an interesting bulletin, so I have rolled up my sleeves and given it a shot. Obviously there have been whole books written on rook endings, so I can only scratch the surface here. In common with most Endgame Corners, there is very little concrete analysis – for that you really will need a book or other serious work.
Instead, in Absolute Basics I will cover just 2 key positions that you really have to know by heart. There are dozens of other positions that arguably should have been included, but I have been as ruthless as possible in trying to boil it down to the minimum.
Then in Principles I will cover 8 easy to remember ideas that can help guide you through practical rook endings. I have found these principles immensely helpful over the years. In most cases I provide just one simple example to illustrate the point, but you don’t even need to remember the examples to use the principles.
Apologies to those grandmothers I am teaching to suck eggs, but hopefully someone will get something useful out of the article!
Peter Anderson
August 2021
Absolute Basics
Philidor’s Drawing Method
When you are on the defending side of rook and pawn vs rook, it is important to get your king in front of the pawn and to stop your opponent’s king from advancing ahead of the pawn. If you can do this it is not too hard to draw but it is best to know a method for doing so, and the simplest is the one Philidor demonstrated a few centuries ago!
The position below is drawn (with either side to move) and the simplest method is this: Black keeps his rook on the sixth rank (his third rank) until the pawn advances to the sixth rank and then immediately goes behind and keeps checking the White king which can no longer hide in front of the pawn.
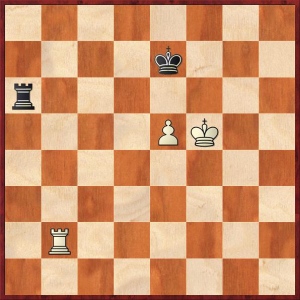
Play though Philidor’s defensive method here.
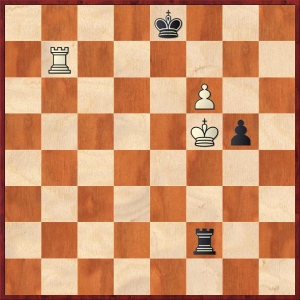
Lucena Position
The other key thing to know is how to win the position below which is called the Lucena position. Why is this so important? Because if the defending side in R+P vs R cannot get his king in front of the pawn, then there is a very good chance this position will eventually be reached!
Black has White’s king hemmed in and whilst he can force it out by 1.Re1+ and 2.Kd7 that doesn’t achieve anything as Black will keep checking White’s king. Instead White can prepare to cover his king from the checks and the most efficient way is to bring his rook up to the fourth rank. This method works with b, c, d, e, f and g pawns (and the nearest equivalent positions with a and h pawns are drawn anyway). Some other methods work OK for c to f pawns but not b and g pawns.

Play though Lucena’s winning method here.
Principles
Here are a set of 8 principles that apply to many rook and pawn endings. These are not rules in the sense that they do not always work, so you have to keep thinking and decide what is correct for the specific position you are looking at. But they are an excellent starting point, will often be right, and can help guide your thinking. They normally apply just as well (or better) to rook endings with many pawns as well as R+P vs R.
1. King for defence, rook for counterplay
If you are on the defending side and your opponent has a passed pawn, then it is normally best to get your king in front of the passed pawn and get your rook as active as possible to provide counterplay. We have seen this already in R+P vs R but it holds true for many rook endings with multiple pawns.
In fact, if you are standing worse in a rook ending and it looks like your opponent may be able to create a passed pawn in future, it can often be a good idea to get your king over in advance to where the passed pawn may emerge.
So in the example below, White should play 1.Kd3 to block the passed pawn and then 2.Rb2 followed by 3.Rc2 or 3.Rf2 to get the rook active, or perhaps 1.Rf3 followed by 2.Kd3. In either case he has good drawing chances. He should definitely not try blocking the pawn with 1.Rd3 which would leave the rook passive and White most probably lost.
2. Cutting off the opposing king
As the attacker, this is the reverse of the previous principle. As the attacking side you should try to prevent the opposing king getting in front of your passed pawn, often by cutting it off with a rook.
In the diagram below, White to play, there is only one move that wins: 1.Re1 cutting off the Black king. You can see the example played out here.
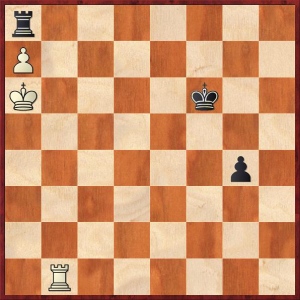
The example above dealt with cutting off the opposing king from your passed pawn, but it is also a good idea to cut off the opposing king from its own passed pawn. This applies mainly when the opposing rook cannot help its own passed pawn. In the diagram below 1.Kb7 immediately fails to win as 1…Rxa7 2.Kxa7 Kg5 allows Black to support his passed pawn and get a draw. Instead, 1.Rb5! wins. See the example played out here.
With more pawns on the board, cutting off the opposing king can also apply in a more generalised way to preventing the king reaching a critical part of the board where the key action is going to take place
3. Rooks belong behind passed pawns.
This is perhaps the most well known rook ending principle and it is generally correct but has very many exceptions!
As the attacking side with the passed pawn, you want your rook behind the pawn, supporting the pawn’s advance whilst not getting in its way. This principle holds true most often when the pawn is far advanced for the reason that the supporting rook has more freedom to move on the file behind the pawn and therefore do work along more ranks as well as the file.
The problem with defending your passed pawn from the side is that if your opponent has a rook on the pawn’s file, you cannot advance the pawn without losing it (unless your king is supporting it).
The problem with having your rook in front of the pawn is two-fold. Firstly as the pawn advances it restricts your rook’s mobility. Secondly, you will need to find a way to get your rook out of the way to queen the pawn, which may or may not be possible.
In the position below White has a choice, to defend his a-pawn with 1.Ra4 or 1.Rd5. The correct move is 1.Ra4 as played in the famous Alekhine-Capablanca endgame, which White went on to win.

As the defending side you would also like the rook to be behind the pawn. In the position below, White’s advantage is much reduced and with correct play this should be drawn, regardless of whether White plays 1.Ra7 or 1.Rd5.
4. Maximise your checking distance
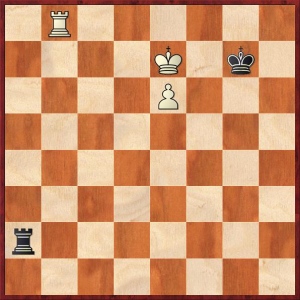
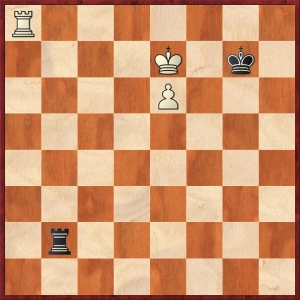
Especially when defending, you may rely on harassing the opposing king with multiple checks. This works best when your rook is further away from the opposing king. Have a look at the two almost identical positions below, both with Black to move. The first is a draw, the second is won for White. In the first Black has enough distance to keep checking the White king from the side, whereas in the second he doesn’t.
You can see these two positions played out, and hence the difference, here and here.
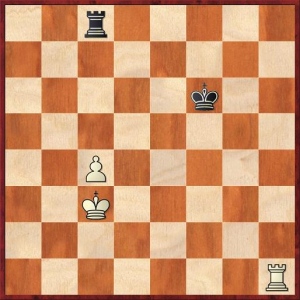
5. Rook vs Pawn: with the rook, get your king to the opposite side of the pawn from your opponent’s king.
Rook and pawn endings can often reduce to rook vs pawn so knowing about these is important. Obviously these are easily won if your king is in front of the pawn, so this principle applies when your king is behind the pawn. There is a surprising amount of theory on them, most of which I can’t remember!
However, there is one simple principle that is very helpful. If you are the side with the rook, you want to get your king to the opposite side of the pawn to the opposing king. Conversely, if you have the pawn, if you can block the opposing king because it is on the same side of the pawn then you have better drawing chances.
In the diagram below it is Black to move and only one move wins: 1…Kg3 aiming to take the king to h4, h5 etc, i.e. to the opposite of the pawn to the White king. (Eagle-eyed readers will recognise this as a puzzle from May last year).

See it played out here.
6. Opposing pawns can provide shelter from checks
Sometimes you can hide behind opposing pawn to avoid defensive checks. Accordingly, it is not always a good idea to grab every pawn you can. A simple example is provided below, though this theme occurs in endgames with more pawns too.
1.Kxg5? leads to a draw using Philidors method of checking from the rear.
1.Kg6 wins, as the g5 pawn provides cover for the White king from the checks and White can force his pawn though to the queening square.
7. It is often better to be pawn down with active pieces than have level material with passive pieces
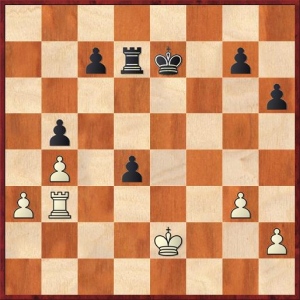
In the position below passive defence will lose for Black (note White has his king in front of the dangerous g-pawn) as White will play d4 and gradually push through his connected pawns.

However, Black can sac the g-pawn and force White’s pieces to passive positions if he tries to keep the pawn, and eventually Black can force it down to a drawn R+P vs R. Black starts 1…Rb6! and one line goes 2.Kxg4 Rb4 3.Kf5 Rd4 4.Ra3 a5 and White cannot make any progress with the pawns blocked and his rook passive.
See it here.
8. Creating a passed pawn can often be the best defensive method
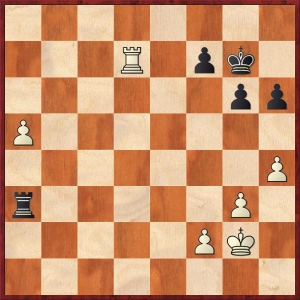
A specific case of the active pieces principle is creating a passed pawn to produce counterplay. Consider the diagram below, where it is White to move in Lasker-Levenfish. At first sight it is hopeless for White as Black’s forces can combine to push the a-pawn through. However, Lasker held the draw by creating a strong passed pawn with 1.f5! exf5 2.e6! fxe6 3.Kxg6.

See analysis of this example here.
Summary of Principles
Please remember these are not infallible rules but rather principles that are right a lot of time and can help guide your thinking.
1. King for defence, rook for counterplay
2. Cutting off the opposing king
3. Rooks belong behind passed pawns
4. Maximise your checking distance
5. Rook vs Pawn: with the rook, get your king to the opposite side of the pawn from your opponent’s king
6. Opposing pawns can provide shelter from checks
7. It is often better to be a pawn down with active pieces than have level material with passive pieces
8. Creating a passed pawn can often be the best defensive method.