We all know that a lone rook can rarely win versus a lone bishop. But what about rook and pawn v bishop? As long as neither the rook nor pawn is immediately en prise that must always be a win, right? That’s what I thought until about a year ago but I was wrong. Of course, it is nearly always won, but there are a few important exceptions which we will look at here.
Right and Wrong Corners
But let’s start going back to R v B and the importance of right and wrong corners for the defending side, as this is relevant to R+P v B too.
It is White to move in the diagrams below.
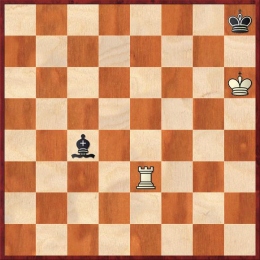
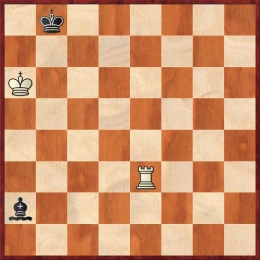
The first is drawn. If White checks on the back rank then after Bg8 he either has to move back or it is stalemate. The second is won. White traps the black king in the corner with Rc3, plays Kb6, chases the bishop from a2 and b3 (if needs be by playing Ra3 or Rb2) and then the win is straightforward. The key difference between the two is that in the second one after a check on the back rank and Bc8 then White can just move the rook along the back rank and it is not stalemate – in fact it is zugzwang. So the golden rule for the defending side is stay away from the corner which has the same colour square as its bishop.
King First (and a Central Pawn)
So with this basic knowledge let’s come back to the question of R+P v B. The first thing to say is that this ending is a great example of the king before pawn rule, i.e. the attacking side should advance his king ahead of the pawn. This will generally make converting won positions much simpler and in some cases can be absolutely necessary to secure the win.
This rule is always true but we will start by illustrating it with the example of a central pawn.

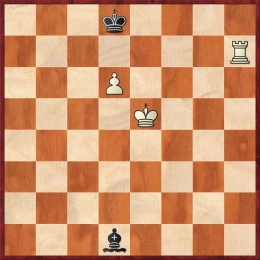
For instance, in the positions above (either side to move, it doesn’t matter), the first is a very easy win whilst the second is won but requires precision from White. He needs to get his king to c6 or e6 to win without the bishop being able to check it away (it would be easy if the bishop was on a dark square) or to be able to play d7 at the right time (if played immediately it is met by Kc7 with a drawn position). It is doable but requires careful manoeuvring of the rook if Black defends accurately.
So a central pawn on the 6th rank always wins but it may be tricky if the bishop is on the right coloured square.
A Knight’s Pawn on the 6th Rank
With a knight’s pawn the attacking side always wins. This is always straightforward as long as you remember one key idea.

If the bishop was on a light square this would be an easy win with Kh6 etc. But with it on a dark square, the defending king is in the wrong corner. White wins by giving up the pawn and forcing mate in the corner e.g. 1.g7 Kh7 2.Rf7! (to trap the king in the corner) Bd4 3.g8=Q+! Kxg8 4.Kg6 etc, whilst 1..Bxg7 loses to 2.Kg6 e.g. 2…Be5 3.Re7 Bd6 4.Re8+ Bf8 5.Rd8
The Wrong Bishop’s Pawn on the 6th Rank – Draw!
Now we will look at the case of the wrong bishop’s pawn (from the attacker’s perspective) or the right bishop (from the defender’s perspective). The position below is drawn.
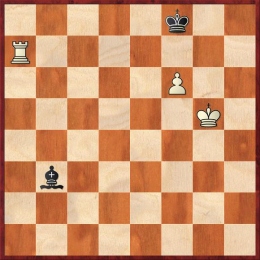
Here the bishop is on the right colour square – it defends e6 and g6 and the king is near the right corner. Black keeps his bishop on the a2-g8 diagonal until the white king goes to g6 and then he checks it before returning to the a2-g8 diagonal. Unlike with a central pawn there is no way for the rook to drive the bishop off the key diagonal and prevent the check on g6. And unlike with a knight’s pawn the pawn sac does not work because the king is in the safe corner.
If the pawn was not so advanced this would be won. If the bishop was on a dark square (or the pawn was a c-pawn) this would also be won.
Wrong Rook’s Pawn on the 5th
Things are even worse with the wrong rook’s pawn. Assuming the defensive pieces are reasonably placed, it is a draw by the time the pawn is on the fifth rank. So for instance, even with White to move, the position below is drawn.
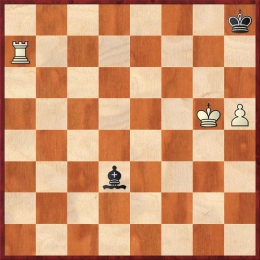
The drawing technique depends on having an effective barrier against the white king rather than the stalemate method normally associated with the safe corner. It is important not to let the attacking side hold the opposition here.
So for instance after 1.Kh6 Black plays 1…Kg8! (forced) and after 2.Rg7+ replies 2…Kf8! (forced). The White king cannot go forward and the pawn cannot advance. If White plays, for instance, Rg2 and then Kg5 to release the pawn then the black king can return to g8.
Note that 2…Kh8 loses as does 1…Bc4 attempting the stalemate defence. I will leave you the pleasure of working out how and why!
Attempting a lateral attack with 2.Ra8+ does not fair any better as after 2..Kf7 the barrier is still in place.
Peter Anderson, July 2021